highly available rabbitmq with AWS
Message Queues are a good thing. Asynchronous message passing and processing have various advantages, and that is why we increasingly become dependent on our message queues and broker. This comes back to bite us later when, due to any reason, the broker/queue becomes unreachable.
Dangers range from losing future/running/queued tasks to our app servers (generally the producers) going down because they can’t connect with the broker. This, of course, isn’t a desirable thing for any organisation.
SquadRun relies heavily on these tasks for doing things like sending notifications, generating reports etc. to mission critical jobs like timing out player’s missions. Obviously, we can’t afford to lose our tasks or the connection to the broker.
The solution for this is to setup a Highly Available (HA) system.
High availability (from Wikipedia) is a characteristic of a system, which aims to ensure an agreed level of operational performance, usually uptime, for a higher than normal period.
*SquadRun uses Django and Celery as producers and consumers and RabbitMQ as the message broker. Our servers are hosted on AWS. This guide assumes the same stack.
what needs to be done
RabbitMQ’s documentation about HA is a must read to understand what is going on.
In a nutshell, we need to create an RMQ cluster with queue mirroring enabled, which means, tasks of each queue are mirrored to all the other nodes in the cluster as well. So in an event of one of the nodes going down, all its master queues will start functioning from the next oldest node available in the cluster.
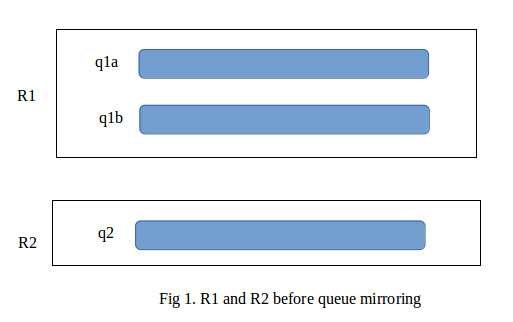
For example, we have a cluster with two nodes, R1 and R2. R1 has queues q1a and q1b while R2 only has one queue, q2. The configuration will look something like this:
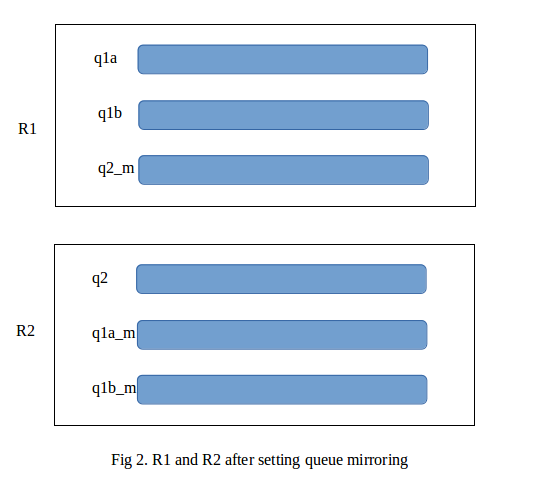
But when we enable queue mirroring, each queue has its mirror on every other node in the cluster. In our case, we will have three additional queues, q2_m at R1 and q1a_m and q1b_m at R2, as shown:
how it works
In the above example the queues q1a, q1b and q2 are called the master queues while the mirrors q1a_m, q1b_m and q2_m are called slave queues.
The protocol followed in such a configuration is as follows:
- Whenever a task is published for a queue, it is enqueued onto master queue first from where it is mirrored to all other slave queues. Similarly, whenever a task is consumed from the master queue, it will be dropped from the slave queue(s) as well.
- If there are
nnodes in an RMQ cluster then any queue made on any node will have a mirror on every other node in the cluster. So there will ben-1mirror or slave queues per queue in a cluster. - In the case of multiple slave queues, the oldest slave is promoted to become the new master in an event of the master going out of order.
-
A message sent, for a queue, to any of the nodes in the cluster only gets enqueued if the node holds the master queue, else it will be sent to the RMQ node that holds the master queue for that queue and the message gets enqueued over there.
Continuing with the aforementioned example. A task
T1sent to nodeR1for queueq1awill get enqueued directly toq1aand subsequently get mirrored toq1a_m.
And a taskT2sent to nodeR1for queueq2will first be routed to R2 where it will get enqueued toq2and subsequently mirrored toq2_m. - Similarly, a message is always consumed from the master queue and subsequently dropped from the mirror queues. If a consumer tries to make a connection with some other node it will be routed to the correct node internally.
- Communication between RMQ cluster nodes is only possible when each RMQ node has the same Erlang key. This erlang cookie on Linux system is usually present in the
/var/lib/rabbitmq/directory.
enough chit chat
rmq nodes
- From the EC2 management console page, create a new security key which shall be same for all the AWS instances. Let this be named “rabbitmqkey”.
- Create a new security group, to be used by our EC2 instances, with the following under inbound ports:
SSH                TCP             22         0.0.0.0/0
Custom TCP Rule    TCP         0-65535        <this security group>
In the above step adding your own security group to the rules might not be possible without creating the group first so create the security group first with SSH rule only and later add the 2nd rule.
- Next create a new AWS EC2 instance (This will be the first node of the RMQ cluster). Use the same security group and security key we created in the previous steps.
- Upon creation of your instance ssh into your EC2 machine and run the following commands to install and set up a RMQ node running on this instance.
sudo apt-get install rabbitmq-server sudo rabbitmq-plugins enable rabbitmq_management sudo rabbitmq-server -detached - The Management plugin is provided by rabbitMQ to be able to check status of tasks and queues present on the particular node and in the cluster.
- Now, to ensure that each node of the rabbitMQ cluster has the same erlang cookie and to avoid installing RMQ again and again on each server, we will create an AMI (Amazon machine image) of the above EC2 instance.
- After the image is constructed, create a new instance using that image. Make sure this instance also belongs to the same security group (and also, is created in a different availability zone, because then what’s the point?)
- SSH into the new EC2 instance created and type in the following commands:
sudo rabbitmqctl stop_app
sudo rabbitmqctl join_cluster rabbit@<private ip of 1st EC2 instance>
sudo rabbitmqctl start_app
sudo rabbitmqctl cluster_status
‘join_cluster’ will connect this second node to the cluster of the 1st node.
- Next, SSH into the main RMQ node and set the HA Policy. The policy needs to be activated just once for the entire cluster and should ideally be done at the first node of the cluster. The command for the same goes as:
sudo rabbitmqctl set_policy ha-all "" '{"ha-mode":"all","ha-sync-mode":"automatic"}'
load balancer
We used AWS’s Elastic Load Balancer (ELB) to set up our load balancing. ELB directs requests to its nodes in a Round Robin fashion but we need not worry about it as the messages will get internally routed to the master node when need be.
Launch an ELB with the same security group as was used to create the EC2 instances.
Set the load balancer’s port configuration as:
- 5672 (TCP) forwarding to 5672 (TCP) - For producers and consumers
- 15672 (TCP) forwarding to 15672 (TCP) - For the management plugin
Congratulations, your highly available RabbitMQ system is ready!!
gotcha!
ELB resets the connection with the application servers periodically. Thus, it is possible that your producers send a task to the ELB which get lost because of this resetting of connection between the ELB and the nodes.
In such situation, we will need to enable confirmation of the tasks published. This can be achieved for Django and Celery by setting the following in your settings.py:
BROKER_TRANSPORT_OPTIONS = {'confirm_publish': True}
This way, your publisher will wait for the RMQ to send an ack before sending any further tasks to the same queue.